If you own a website, it is safe to assume that you would like to track specific events like a button click, pdf download or form submit on your site. After tracking, you would like to view those specific events in your Google Analytics Interface. All these activities could be easily implemented using the Google Tag Manager event tracking feature which helps you track real-time events like Button Clicks on your website. These website events can be later viewed through the Google Analytics reporting interface. So let’s go through a guide which explains how to implement and track website events in Google Analytics through Google Tag Manager Interface. For this tutorial, let’s take the example of a Button Click Event on a website.
Google Tag Manager Event Tracking Tutorial:
So let’s go through a step by step tutorial to track auto events using Google tag manager:
Step 1 – Generic Trigger Creation and Built-in Variables Configuration in Google Tag Manager
To begin with, go to Google Tag Manager Interface and navigate to your account. In the trigger section of the interface, create a Generic Click Trigger which fires on All Clicks and save it.
![]()
As event tracking is initiated via click triggers, one should make sure that all the click variables are configured in the Built-In Variables menu.
Step 2 – Preview and Debug mode and Google Tag Manager Event Tracking Data Layer Variables
Next , you need to access the preview and debug section in the Google Tag Manager Interface and navigating to a particular web page where you need to track the click events in GTM .
The below screen shows Google Tag Manager in Preview and Debug Mode .
After reloading the page, you’ll be able to see all the tags that are fired, or still pending, in the preview and debug console at the bottom of the page.
For example, let’s try and track the button click event for the ‘Know More’ call-to-action as shown below :
Now click the ‘Know More’ button with CTRL Key pressed to remain on the same web page and to open the ‘Know More’ link in a new tab .
On clicking the ‘Know More’ button, you will be able to see a new gtm.click event on the summary tab at the bottom right corner of the preview and debug mode of that particular page.
We can see here, as demonstrated by the image below, that no tags have been fired. This is due to the fact that we haven’t implemented any tags as of now.
![]()
Similarly, clicking another button on the same web page will generate a new gtm.click event on the summary tab.
Look closely and you’ll be able to note the difference in the Click Data Layer Variables (Click Classes, Click Elements) in the two recently generated gtm.click events.
The Click Data Layer Variables will vary from event to event, based on the HTML code of the page. Note any one Click Variable difference when the intended button ( In this case the ‘Know More’ Button) is clicked compared to the Click Variable when any other Button click occurs on the same page.
To get a better idea, let’s assume that ‘btn-knowmore’ is the Click Data Layer Variable for a ‘Know More’ button click and ‘btn-learnmore’ is the Click Data Layer Variable for the ‘Learn More’ button click on the same page . In this scenario, If you need to track the ‘Know More’ Button Click, then you should select the ‘btn-knowmore’ Click Data Layer Variable as your firing rule for the button click event tag .
Step 3 – Editing Generic Trigger and Configuring Firing Trigger in Google Tag Manager
After noting the difference in the Click Data Layer Variables, access the Google tag manager interface and edit the previously created generic trigger and rename it as ‘Know More Button Click’ and change the firing rule as some clicks may contain the ‘bts-knowmore’ class by noting the difference in the Click Data Layer Variables and then save the trigger.
Step 4 – Configuring Google Tag Manager Event Tracking Parameters
It’s now time to configure the Google Tag Manager Event tracking parameters by accessing the tag menu in GTM. Click on ‘new tag’ and give a suitable name, for example – ‘GA – Event – Know More Button’ – and select Universal analytics as the tag type. You’ll also have to provide the tracking id; this can be obtained in the Google Analytics admin section. In this scenario, we have given the Google Tag Manager event tracking parameters in the following format – tag type as ‘event’, Category as ‘Home Page Know More Button Click’, Action as ‘Click’, and select label as ‘Page Path’.
Now Choose the Know More Button Click Trigger as the ‘firing trigger’ and save the tag.
![]()
Step 5 – Verifying firing of Event Tag in Preview and Debug mode of Google Tag Manager
To verify whether a tag is fired on the event, go to preview and debug mode of Google Tag Manger and check if the created event tag is firing for the intended button click. If the event tag is firing on the button click event, then your implementation does not have any errors.
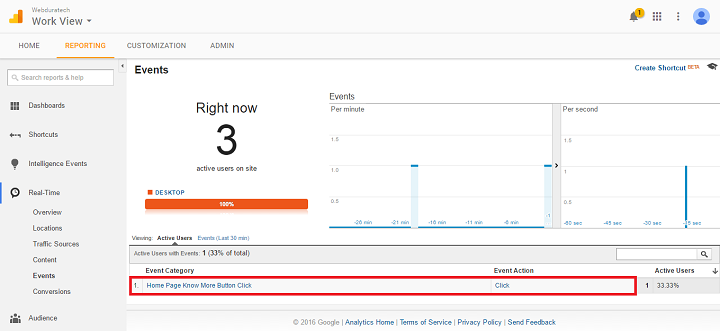
The same can be verified by navigating to the Google Analytics real-time reporting interface to check if events are being registered in analytics too. If event updates are being shown, then your implantation procedure was perfect.
Step 6 – Creating Version and Publishing
After verifying your implementation, go ahead and create a version in Google tag manager. You can give a title to the version and save it.
![]()


Comments